zondag 2 december 2012

Winterswirls

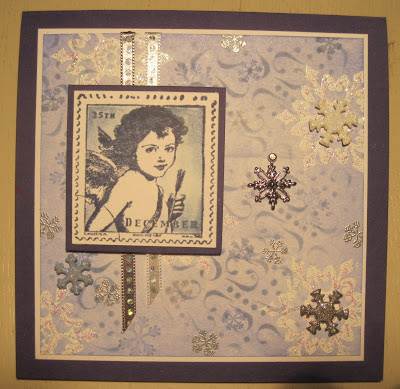
1 december, de eerste van de maand, dat betekent een nieuwe uitdaging bij Art Journey Design Team Blog. Deze keer koos Louise het thema en het werd.....'wintersferen in wit blauw en zilver'.
Neem de uitdaging aan en ga aan de slag met dit thema en met Art Journey stempels en doe met ons mee! Alle info over de challenge en inspirerende voorbeelden vind je hier.
 
1st of december, the first day of the month, that means a new Challenge att Art Journey Design Team Blog. This time Louise has chosen the theme....'Wintery Theme in the colours white, blue and Silver'. Take up the challenge with this theme and Art Journey stamps and joins us!
Go to the Art Journey Design Team Blog for more details on the challenge and for inspiring work by the design team members.
 
Voor de Art Journey Challenge 28: "Wintersferen in wit blauw en zilver" heb ik deze kaart gemaakt.
I've made this card for the Challenge 28- "Wintery Theme in White, Blue and Silver"
 
Als eerste heb ik de stempel Ornament van Art Journey 5x gestempeld op wit papier met Versamark. Dit bestrooit met embossing poeder van Judi Kins Weisse Diamanten. Dit witte embossing poeder heeft al een glimmertje van zichzelf en is prachtig voor sneeuw en wintereffecten. Vervolgens heb ik de hele oppervlakte van de kaart bewerkt met Pan Pastels Ultramarine and Ultramarine Tint.
 
I started to stamp the stamp Ornament 5 times rondomly on white cardstock with Versamark. I used the embossing powder Judi Kins White Diamonds. This embossingpowder has a nice sparkle in it and is very wonderful for wintery and snow effects
After that I worked the whole surface with Pan Pastels Ultramarine and Ultramarine Tint

 
Daarna heb ik verschillende sneeuwvlokjes gestempeld van de sheets "Angels" met versamark en ingewreven met Pan Pastels. Vervolgens heb ik de mini template Curly Frame gebruikt en ook weer met Pan Pastels gewerkt.
 
Next I stamped several snowflake stamps from the sheet "Angels" with Versamark en worked them again with Pan Pastels.After that I used the mini template Curly Frame in combination again with the Pan Pastels

De afbeelding van het engeltje van de sheet Christmas Tree heb ik gestempeld met Stazon Ultramarine en een beetje ingekleurd met Distress Ink Chipped Saphire. Dit gemat op een stukje blauw. Tenslotte wat lintjes aangebracht een charm en wat stickertjes en afbeelding verhoogd opgeplakt met foamtape.
 
 I stamped the angel stamp from the sheet Christmas Tree with Stazon Ultramarine en coloured it a bit with Distress Ink Chipped Saphire. I glued on a few ribbons, a charm en some stickers and mounted the image of the stamp with foamtape on the card.


donderdag 1 november 2012

Feelings

 
Feelings...
 
1 november, de eerste van de maand, dat betekent een nieuwe uitdaging bij Art Journey Design Team Blog. Deze keer koos Jeanette het thema en het werd.....'rond'.
Neem de uitdaging aan en ga aan de slag met dit thema en met Art Journey stempels en doe met ons mee! Alle info over de challenge en inspirerende voorbeelden vind je hier.

1st of november, the first day of the month, that means a new Challenge att Art Journey Design Team Blog. This time Jeanette has chosen the theme....'round'. Take up the challenge with this theme and Art Journey stamps and joins us!
Go to the Art Journey Design Team Blog for more details on the challenge and for inspiring work by the design team members.
 
Voor de Art Journey Challenge 27: Round heb ik deze kaart gemaakt.
I've made this card for the Challenge 27: Round
 
 
Eerst heb ik een "mal" gemaakt in een ronde vorm. Om vervolgens een blauwe  ( Stormy Sky )lucht te sponsen en een groene achtergrond ( Crushed Olive )
 
At first I made a round "stencil" I sponged the sky with Stormy Sky and below a green background with Crushed Olive
 
 
Vervolgens takken en grassen gestempeld binnen die cirkel met Brushed Corduroy en Crushed Olive
 
After that I stamped branches, twigs and grasses with Brushed Corduroy and Crushed Olive


De mal vervolgens weg gehaald en op de voorgrond de varens gestempeld met Crushed Olives en de tekst met Brushed Corduroy
 
I took my "stencil"away en stamped the ferns in de front with Crused Olive and the text with Brushed Corduroy
 
 
Tenslotte wat blauwe plakpareltjes van Ursus opgeplakt
 
In the end I used some blue adhesive pearls from Ursus


zaterdag 13 oktober 2012

Live the Life you've Imagined

 
Live the Life you've Imagined
 
Deze kaart heb ik gemaakt met allemaal stempels van Tim Holz. De achtergrond eerst gesponst met distress Ink. Daarna de tekst achtergrond stempel beinkt met de kleuren: Dried Marigold, Peeled Paint, Brushed Cordury and Ripe Persimmon. De vogels heb ik gestemepld met Stazon Timber Brown. Een postmark stempeltje geembossed met goud en uitgeknipt. Een paar lintjes rechts en een labeltje gestempeld en erop geplakt.
 
This Card I've made with Tim Holz stamps. At first I sponged the backgrond with Distress Inks. After that I inked the background stamp with the following colours: Dried Marigold, Peeled Paint, Brushed Cordury and Ripe Persimmon. I've stamped the birds with Stazon Timber Brown.
A little postmark stamp embossed with gold en cut out. Two ribbons on the right and a stamped label glued on the card.


dinsdag 9 oktober 2012

Merry Christmas


Merry Christmas

Een kaartje gemaakt met Art Journey en Penny Black Stempels en Pan Pastel
A card made with Art Journey and Penny Black Stamps and Pan Pastels

 
Eerst de achtergrond van Penny Black Wall Paper Print gemaakt met Versamark op creme papier. Daarna ingewreven met Pan Pastels Bright Yellow Green Shade. Daarna op een rood stuk papier de Curly Frame van Art Journey afgedrukt met Versamark en geembossed met Judikinz Egyptisch Goud embossingpoeder.
 
First I stamped the backgoundstamp from Penny Black Wall Paper Print  with Versamark on cream paper en after that I rubbed it in with Pan Pastels Bright Yellow Green Shade. On a piece of red paper I stamped the Curly Frame from Art Journey and embossed it with Judikins Egytian Gold.
 
 
Een driehoek gesneden van het rode papier, naar een ideetje van Godelieve, en er plakparels van Ursus opgeplakt. Een stukje bruin papier maakt de stam van de boom. Tekst op een stukje creme papier gestempeld en opgeplakt, een stukje lint onderaan met daarop weer plakparels van Ursus. Tenslotte een charm en de klaar is klaar.
 
I cut out a triangle, after an idea of Godelieve, and put adhesive pearls from Ursus on it. A piece of brown paper became the stem of the tree. The text was stamped on cream paper and glued on the card. A ribbon at the bottom of the card with adhesive pearls from Ursus again on it. A charm completes the card.


vrijdag 5 oktober 2012

Diva in Autumn Velvet

 
Diva in Autumn Velvet
 
Een kaart met een van mijn favoriete stempels: Diva van Art Journey en de veer van Nature Flowers. Dit keer heb ik deze stempel gebruikt in combinatie met een embossing folder en Pan Pastels
 
 A Card made with one of my favorite stamps: Diva from Art Journey and the feather from Nature Flowers. This time I've used the stamp in combination with an embossig folder and Pan Pastels
 
 
Ik ben begonnen om het papier te embossen met behulp van de embossingfolder. Vervolgens heb ik het met pan pastels bewerkt. Wat een fantastisch produkt! De herfstkleuren heb ik heel bewust gekozen omdat het weer vandaag echt herfstachtig is!
 
I started to emboss the paper with an embossing folder. After that I worked on the paper with Pan Pastels. What a marvelous product! I choose the autumn colours quite conscious while the weather today here is autumnal!
 

 Een klein pareltje is de oorbel geworden en de ketting heb ik met een goudpen benadrukt. De kaart gemat op goudfolie karton. Een breed lint erachter gespannen op een bruine kaart.
 
A little adhesive pearl became the earring and I accented the necklace with a gold pen. I matted the card on a goldfoil panel. A wide ribbon behind it on a dark brown card.


woensdag 3 oktober 2012

Twinkling Snowflakes

 
***Twinkling Snowflakes ***
 
For The Art Journey Challenge Take Just One Colour I've made a few cards. Dit was the third One. It is a real challenge because working with just one colour is restricting but gives you also the opportunity to look at your stamps and colours in a different way.. So it's an educational challenge also ;) Look for more examples on the blogs of the other Designteam members.. They've made beautiful projects in monochromatic stamping techniques. Get inspired and take part in our challenge for this month !

Voor de Art Journey Challenge Take Just ONE Colour heb ik een aantal kaartjes gemaakt. Dit was de derde. Het is een echte uitdaging want het werken met maar 1 kleur beperkt je maar laat je ook op een andere manier kijken naar stempels en kleuren.. een leerzame Challenge dus ook nog eens ;) Meer voorbeelden kun je vinden op de blogs van de andere Designteamleden die prachtige projecten hebben gemaakt in de monochromatic stempeltechniek. Laat je inspireren en doe mee in onze uitdaging van deze maand!
 
 
These ae the materials I've used and only the colour Stormy Sky  from the Distress serie Ink and the Distress Marker Stormy Sky. Glitter pen from Sakura, Quicky Glue and Glitter. A string silvercord.
 
Dit zijn de materialen die ik heb gebruikt en uitsluitend de kleur Peeled Paint uit de Distress Ink serie en de distress marker Peeled Paint. Glitter pen from Sakura, Quicky Glue and Glitter. een stukje zilverkoord.
 
I started to mask both vertical sides of my square card and sponged the space inbetween. After that I removed the masking tape and sponged the whole card with Distress Ink Stormy Sky. I stamped the text in the right corner below and then I stamped randomly all kinds of snowflakes on the card all stamping with the Stormy Sky. On scrath of paper I stamped the christmas ornament twice and cut them out. With the distress marker Stormy sky I coloured in some details. Put a silvercord behind them and attaced them to the card with foamtape. With a gluepen I marked some details en put glitter on it.
 
Als eerste heb ik verticaal de beide zijkanten van de vierkante kaart afgedekt en de ruimte ertussen gesponst met Stormy Sky. Daarna heb ik het tape verwijderd en de hele kaart nogmaals gesponst met Stormy Sky. De tekst heb ik in de rechteronderhoek gestempeld en daarna willekeurig verschillende sneeuwvlokjes gestempeld met Stormy Sky. Op een restje papier 2x de kerstbal getempeld en uitgeknipt.Met de distress Marker Stormy Sky heb ik wat details ingekleurd. Een zilverkleurig koordje erachter geplakt en de kerstballen opgeplakt met foamtape. Met een lijmpen heb ik wat accenten aangebracht en daarna bestrooit met glitter.


Art Journey Sheets: Noel, Angels and Ornament
Art Journey Sheets: Noel, Angels en Ornament
 

dinsdag 2 oktober 2012

Friendship

 
Friendship

For The Art Journey Challenge Take Just One Colour I've made a few cards. Dit was the second One. It is a real challenge because working with just one colour is restricting but gives you also the opportunity to look at your stamps and colours in a different way.. So it's an educational challenge also ;) Look for more examples on the blogs of the other Designteam members.. They've made beautiful projects in monochromatic stamping techniques. Get inspired and take part in our challenge for this month !

Voor de Art Journey Challenge Take Just ONE Colour heb ik een aantal kaartjes gemaakt. Dit was de tweede. Het is een echte uitdaging want het werken met maar 1 kleur beperkt je maar laat je ook op een andere manier kijken naar stempels en kleuren.. een leerzame Challenge dus ook nog eens ;) Meer voorbeelden kun je vinden op de blogs van de andere Designteamleden die prachtige projecten hebben gemaakt in de monochromatic stempeltechniek. Laat je inspireren en doe mee in onze uitdaging van deze maand!


These ae the materials I've used and only the colour Peeled Paint  from the Distress serie Ink and the Distress Marker Peeled Paint. Mini Template Window screen and adhesive pearls from Ursus.
 
 Dit zijn de materialen die ik heb gebruikt en uitsluitend de kleur Peeled Paint uit de Distress Ink serie en de distress marker Peeled Paint. Mini Template Window screen en plakparels van Ursus.

 
Art Journey Sheets: Pear, Tree and Summergirl
Art Journey sheets: Pear, Tree en Summergirl


maandag 1 oktober 2012

You can Dance....

For The Art Journey Challenge  Take Just One Colour I've made a few cards. Dit was the first One. It is a real challenge because working with just one colour is restricting but gives you also the opportunity to look at your stamps and colours in a different way.. So it's an educational challenge also ;)  Look for more examples on the blogs of the other Designteam members.. They've made beautiful projects in monochromatic stamping techniques. Get inspired and take part in our challenge for this month !

Voor de Art Journey Challenge Take Just ONE Colour heb ik een aantal kaartjes gemaakt. Dit was de eerste. Het is een echte uitdaging want het werken met maar 1 kleur beperkt je maar laat je ook op een andere manier kijken naar stempels en kleuren.. een leerzame Challenge dus ook nog eens ;) Meer voorbeelden kun je vinden op de blogs van de andere Designteamleden die prachtige projecten hebben gemaakt in de monochromatic stempeltechniek. Laat je inspireren en doe mee in onze uitdaging van deze maand! 

 
I wanted to make a large card and I took an A4 sheet and folded it. At first I taped the two outsides of my card and sponged the space between with Distress Ink Milled Lavender. After that I stamped my images and words with Seedles Preserves. The Stamps I used are from Art Journey sheets: Dance, Grunge, Silhouette and Clocks. In the end I took my tape of and stamped the text below and the label on the right side on top. A metal mesh "ribbon"completed the card.

Ik wilde een grote kaart maken en heb een A4 dubbel gevouwen. Als eerste heb twee stroken afgeplakt. De onbedekte strook heb ik vervolgens gesponst met Distress Ink Milled Lavender en daarna bestempeld met Seedless Preserves. Als stempels heb ik gebruikt Art Journey sheets: Dance, Grunge, Silhouette en Clocks. Als laatste heb ik het tape weg gehaald en de tekstregel onderaan gestempeld en het labeltje langs de rand rechtsboven. Nog een "lintje"van metaal achtig gaas en de kaart was klaar.